Few things are better than fresh bread, but unfortunately, bread doesn’t stay fresh for very long. Whether you buy sandwich bread, artisan loaves, dinner rolls, or homemade bread, it’s common to end up with more than you can eat before it starts to go stale.
Fortunately, freezing bread is one of the easiest ways to extend its shelf life while maintaining its flavor and texture. When frozen properly, bread can stay fresh for months and taste nearly as good as the day it was baked.
In this guide, you’ll learn several simple methods for freezing bread to keep it fresh, along with tips for choosing the best option based on how you plan to use it later.
1. Why Freeze Bread?
Freezing bread helps prevent food waste and saves money. Instead of throwing away stale bread, you can preserve it while it’s still fresh and enjoy it weeks or even months later.
Another benefit is convenience. Having frozen bread on hand means you always have a backup loaf available for sandwiches, toast, and quick meals. It’s especially useful for families who buy bread in bulk or bake homemade bread regularly.
Unlike refrigeration, which can actually cause bread to stale faster, freezing helps preserve moisture and freshness when done correctly.
2. How to Freeze Bread Properly
There are several ways to freeze bread depending on the type of bread and how you plan to use it. Some methods are ideal for long-term storage, while others make it easier to grab individual portions as needed.
Method 1: Freeze a Whole Loaf of Bread
Freezing an entire loaf is a great option if you don’t plan to use the bread immediately and want to preserve maximum freshness.
Step 1: Make Sure the Bread Is Completely Cool
If you’re freezing homemade bread, allow it to cool completely before packaging. Warm bread can release steam, which may create moisture inside the packaging and lead to freezer burn.
For store-bought bread, simply ensure the loaf is fresh and free from excess moisture before freezing.
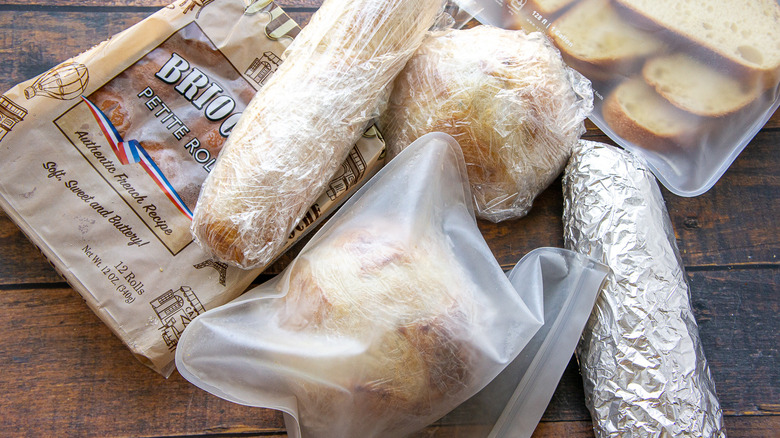
Step 2: Wrap the Loaf Tightly
Wrap the entire loaf in plastic wrap, aluminum foil, or freezer paper. The goal is to create a barrier that protects the bread from exposure to air.
A tight wrap helps preserve moisture and prevents the bread from absorbing odors from other foods in the freezer.
Step 3: Place in a Freezer Bag
After wrapping, place the loaf inside a large freezer-safe bag. Removing as much air as possible before sealing provides an extra layer of protection against freezer burn.
Step 4: Label and Freeze
Write the date on the bag and place the loaf in the freezer. For the best quality, use frozen bread within 3 months.
Pros and Cons
Freezing a whole loaf provides excellent freshness protection. However, you’ll need to thaw the entire loaf before using it, which may not be convenient for everyone.
Method 2: Freeze Bread Slices
Freezing individual slices is one of the most practical methods because it allows you to remove only the amount you need.
Step 1: Slice the Bread
If the bread isn’t already sliced, cut it into even slices before freezing. Pre-slicing makes it much easier to prepare sandwiches, toast, and quick breakfasts later.
Step 2: Separate the Slices
Place a small piece of parchment paper between groups of slices if desired. This can help prevent slices from sticking together, especially during long-term storage.
Step 3: Place in a Freezer Bag
Arrange the slices neatly inside a freezer-safe zip-top bag. Press out excess air before sealing to help maintain freshness.
Step 4: Freeze Flat
Lay the bag flat in the freezer until the slices are frozen. This keeps the slices from becoming misshapen and makes storage easier.
Pros and Cons
Bread slices are incredibly convenient because you can remove one or two slices at a time. The only drawback is that sliced bread may be slightly more exposed to air than a whole loaf.
Method 3: Freeze Rolls and Buns
Dinner rolls, hamburger buns, and hot dog buns freeze very well and are easy to store.
Step 1: Cool Completely
If the rolls or buns are homemade, allow them to cool fully before freezing. Freezing warm baked goods can create condensation, which affects quality during storage.
Step 2: Wrap in Small Portions
Divide the rolls into portions that match how you’ll use them later. For example, package hamburger buns in sets of four if that’s what your family typically needs.
Step 3: Place in Freezer Bags
Transfer the wrapped portions into freezer-safe bags. Removing excess air helps maintain freshness and prevents freezer burn.
Step 4: Freeze
Store the bags in the freezer and label them with the date. Most rolls and buns maintain excellent quality for up to 3 months.
Pros and Cons
This method is convenient for meal planning and prevents the need to thaw large quantities at once. However, it requires slightly more packaging than freezing a single loaf.
Method 4: Freeze Homemade Bread
Homemade bread often contains fewer preservatives than store-bought bread, making proper freezing especially important.
Step 1: Allow the Bread to Cool Completely
Freshly baked bread should cool to room temperature before freezing. This helps prevent trapped moisture from forming ice crystals inside the packaging.
Step 2: Wrap the Bread Securely
Use plastic wrap, freezer paper, or aluminum foil to wrap the bread tightly. Multiple layers can provide extra protection for long-term storage.
Step 3: Add an Outer Layer of Protection
Place the wrapped bread into a freezer-safe bag or airtight container. The double layer helps preserve flavor and texture.
Step 4: Freeze Promptly
Freeze the bread as soon as possible after it has cooled. The fresher the bread is when frozen, the better it will taste after thawing.
Pros and Cons
Homemade bread freezes exceptionally well when packaged properly. However, because it often lacks preservatives, proper wrapping is especially important.
3. Which Freezing Method Is Best?
Best for Long-Term Storage
A whole loaf generally provides the best protection against moisture loss and freezer burn.
Because there are fewer exposed surfaces, the bread often retains freshness longer.
Best for Everyday Use
Bread slices are the most convenient option for daily use. You can remove exactly the number of slices you need without thawing the entire loaf.
Best for Family Meals
Rolls and buns work well for family meals because they can be frozen in portion-sized packages. This makes meal planning easier and reduces waste.
Best Overall
For most households, freezing bread slices offers the best balance of convenience and freshness.
Being able to remove individual slices whenever needed makes this method practical for everyday use.
4. How Long Does Frozen Bread Last?
Bread typically maintains its best quality for up to 3 months in the freezer. While it may remain safe to eat beyond this period, its texture and flavor may gradually decline.
Proper packaging is one of the most important factors in preserving freshness. Bread that is tightly wrapped and protected from air will generally last longer and taste better after thawing.
If you notice excessive freezer burn, dry spots, or unusual odors, it’s usually best to replace the bread with a fresh loaf.
Final Thoughts
Learning how to freeze bread to keep it fresh is one of the simplest ways to reduce food waste and always have bread available when you need it. The next time you find yourself with extra bread, don’t let it go to waste. Freeze it properly and enjoy the convenience of having fresh bread ready whenever you need it.
