When it comes to creating a quick, flavorful, and versatile meal, pan-fried chicken breasts are hard to beat. They’re juicy, golden, and seasoned to perfection, making them a staple for busy weeknights or elegant dinners alike.
This dish requires just a handful of simple ingredients and minimal prep time, but the result is a restaurant-quality meal that everyone will love. Below, you’ll find a detailed recipe and expert tips for flawless results.
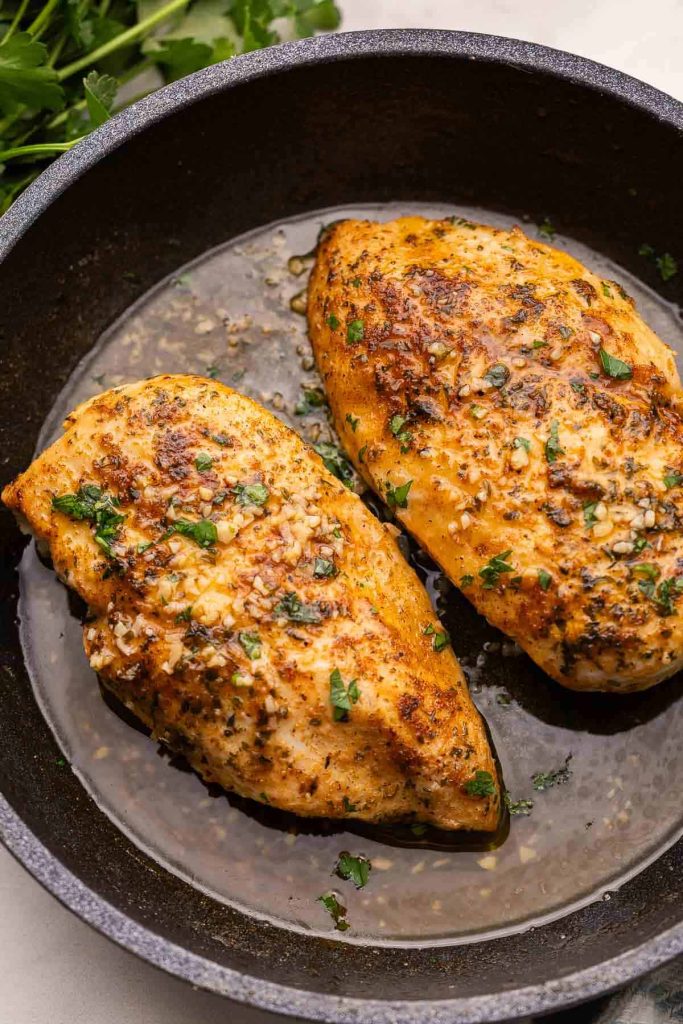
1. Pan Fried Chicken Breasts Recipe
Ingredients
-
2 tablespoons canola oil, divided
-
¾ teaspoon salt
-
½ teaspoon dried parsley
-
¼ teaspoon black pepper
-
¼ teaspoon onion powder
-
¼ teaspoon garlic powder
-
¼ teaspoon paprika
-
2 boneless, skinless chicken breasts
-
1–2 tablespoons butter
-
½ teaspoon minced garlic
Instructions
Step 1: Prepare the Chicken
Start by patting the chicken breasts dry with a paper towel. This step is crucial because removing excess moisture helps the chicken brown evenly in the pan instead of steaming.
Step 2: Season the Chicken
In a small bowl, combine the salt, black pepper, dried parsley, onion powder, garlic powder, and paprika. Mix well. Rub the spice mixture evenly on both sides of each chicken breast. Let the chicken rest for about 5 minutes to allow the seasoning to penetrate the meat.
Step 3: Heat the Pan
In a large skillet, heat 1 tablespoon of canola oil over medium-high heat. The oil should shimmer but not smoke — this is the perfect indicator that your pan is ready for cooking. Using canola oil is ideal because it has a high smoke point and a neutral flavor, allowing the spices and chicken to shine.
Step 4: Sear the Chicken
Place the chicken breasts in the hot pan, smooth side down. Cook for 5–6 minutes without moving them — this helps form a beautiful golden-brown crust. Flip the chicken using tongs and add the remaining 1 tablespoon of canola oil if the pan looks dry.
Continue cooking for another 4–6 minutes, depending on the thickness of your chicken breasts. The internal temperature should reach 165°F (74°C) for safe consumption.
Step 5: Add Butter and Garlic
Once the chicken is nearly done, lower the heat to medium-low and add 1–2 tablespoons of butter and ½ teaspoon of minced garlic to the pan. Let the butter melt and swirl it around to coat the chicken.
Spoon the melted butter over the chicken repeatedly for 1–2 minutes. This technique, known as basting, adds richness and enhances flavor with a subtle garlic aroma.
Step 6: Rest Before Serving
Transfer the chicken to a plate and let it rest for 5 minutes before slicing.
2. Tips for Perfect Pan Fried Chicken Breasts
Achieving the perfect pan-fried chicken takes more than just following a recipe—it’s about mastering technique. Here are some expert tips to guarantee delicious results every time:
Pound Chicken Evenly
If your chicken breasts are uneven in thickness, gently pound them to an even ½-inch thickness using a meat mallet or rolling pin. This ensures the meat cooks evenly and prevents dry or undercooked spots.
Use Medium-High Heat for Searing
The key to that irresistible golden-brown crust is heat. A hot pan caramelizes the natural sugars and proteins in the chicken, locking in moisture and flavor.
Let It Rest Before Cutting
Cutting into the chicken immediately after cooking causes the juices to escape. Allowing a few minutes of rest ensures the juices are reabsorbed, making the chicken moist and flavorful.
Experiment with Flavors
Feel free to customize your seasonings. Add a pinch of cayenne for heat, lemon zest for brightness, or smoked paprika for a deeper flavor profile. This recipe serves as a versatile base for countless variations.
3. Serving Suggestions
Pan-fried chicken breasts are incredibly adaptable and pair beautifully with a wide variety of side dishes. Here are some creative serving ideas to make your meal shine:
Classic Comfort
Serve your golden-brown chicken with creamy mashed potatoes and steamed green beans for a comforting, balanced meal.
Fresh and Light
Slice the chicken thinly and place it atop a bed of mixed greens, cherry tomatoes, cucumbers, and a drizzle of balsamic vinaigrette for a refreshing salad.
Pasta Night Favorite
Serve the chicken over linguine or fettuccine tossed in garlic butter or Alfredo sauce. Add a sprinkle of Parmesan and fresh parsley for an Italian touch.
Healthy Grain Bowl
Create a wholesome bowl with quinoa, roasted vegetables, and avocado slices. Drizzle with a lemon-herb dressing for extra freshness.
Sandwich or Wrap
Slice the chicken thin and add it to a toasted sandwich or wrap with lettuce, tomato, and a smear of mayonnaise or honey mustard for a quick lunch option.
4. How to Store & Reheat Leftover Chicken Breasts
Proper storage and reheating are essential to maintaining the flavor and texture of your pan-fried chicken breasts.
Storing:
-
Let the chicken cool completely before storing.
-
Place in an airtight container and refrigerate for up to 4 days.
-
For longer storage, freeze in a freezer-safe bag for up to 3 months. Make sure to remove as much air as possible to prevent freezer burn.
Reheating:
-
On the Stovetop: Warm a skillet over medium heat, add a splash of water or broth, and reheat the chicken covered for about 3–4 minutes per side until warmed through.
-
In the Oven: Preheat to 350°F (175°C), place the chicken on a baking sheet, cover loosely with foil, and heat for about 10–15 minutes.
-
In the Microwave: Reheat on medium power for 1–2 minutes, checking halfway through. Add a few drops of water and cover the chicken with a damp paper towel to retain moisture.
Avoid overcooking during reheating, as it can dry out the chicken.
Conclusion
This Perfect Pan Fried Chicken Breasts recipe delivers everything you want in a quick, satisfying meal — crispy edges, juicy interiors, and mouthwatering flavor. With just a few simple ingredients and proper technique, you can transform basic chicken breasts into a restaurant-worthy dish.
Read More: Best Damn Air Fryer Chicken Breast