A coconut cream pie is the perfect blend of creamy indulgence and light tropical flavor, making it a favorite dessert for many. This classic pie features a buttery, crisp crust filled with a luscious coconut custard and topped with soft, billowy whipped cream.
Making it from scratch may seem intimidating at first, but with the right steps and a little patience, you can create a bakery-quality dessert right in your own kitchen. This recipe breaks everything down clearly so you can achieve a smooth, rich filling and a beautifully set pie every time.
1. Basic Coconut Cream Pie Recipe ( Yield: one 9-inch pie )
Ingredients
For the Pie Filling:
1 unbaked flaky pie crust
4 large egg yolks
1/4 cup (30g) cornstarch
1 (14 ounce) can full fat coconut milk
1 cup (240ml) half-and-half
2/3 cup (130g) granulated sugar
1/4 teaspoon salt
1 cup (80g) sweetened shredded coconut
2 tablespoons (28g) unsalted butter
1 teaspoon pure vanilla extract
Optional: 1/2 teaspoon coconut extract
For the Whipped Cream:
1 and 1/2 cups (360ml) cold heavy cream or heavy whipping cream
3 tablespoons (20g) confectioners’ sugar or granulated sugar
3/4 teaspoon pure vanilla extract
Optional Garnish:
Unsweetened coconut shavings
Coconut chips
Sweetened shredded coconut
Instructions
Step 1: Pre-bake the Pie Crust
Preheat your oven to 190°C (375°F). Roll out the pie dough and fit it into a 9-inch pie dish. Trim and crimp the edges as desired. Line the crust with parchment paper and fill with pie weights or dried beans.
Bake for about 15 minutes, then remove the weights and parchment and bake for another 10–12 minutes until golden brown. Set aside to cool completely.
Step 2: Prepare the Egg Mixture
In a medium bowl, whisk together the egg yolks and cornstarch until smooth and pale in color. This mixture will help thicken the custard filling.
Step 3: Heat the Coconut Base
In a medium saucepan over medium heat, combine the coconut milk, half-and-half, sugar, and salt. Stir continuously until the mixture begins to simmer gently.
Step 4: Temper the Eggs
Slowly pour about 1/2 cup of the hot coconut mixture into the egg yolk mixture while whisking constantly. This step prevents the eggs from scrambling. Gradually add a bit more if needed to warm the mixture.
Step 5: Cook the Custard
Pour the tempered egg mixture back into the saucepan. Cook over medium heat, whisking constantly, until the custard thickens and begins to bubble. This usually takes about 2–3 minutes.
Step 6: Add Flavorings
Remove the saucepan from heat. Stir in the shredded coconut, butter, vanilla extract, and coconut extract (if using). Mix until the butter is fully melted and incorporated.
Step 7: Fill the Pie Crust
Pour the hot custard into the cooled pie crust. Smooth the top with a spatula. Cover the surface directly with plastic wrap to prevent a skin from forming. Refrigerate for at least 4 hours or until fully set.
Step 8: Make the Whipped Cream
In a large bowl, beat the cold heavy cream, sugar, and vanilla extract using a mixer until stiff peaks form. Be careful not to overbeat.
Step 9: Assemble and Garnish
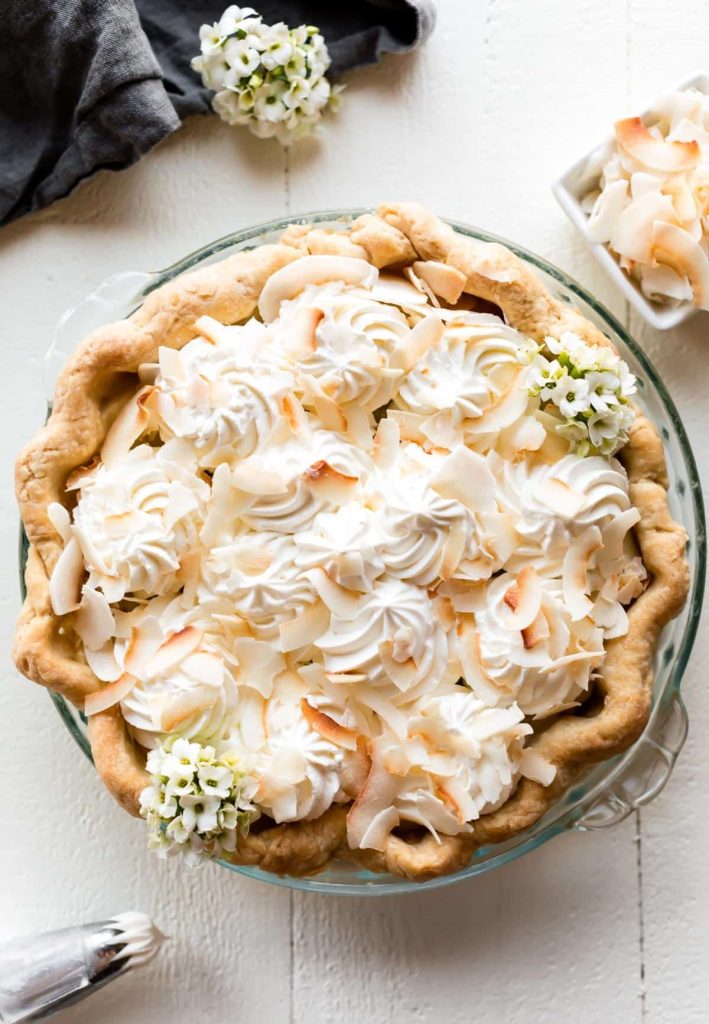
Remove the chilled pie from the refrigerator. Spread or pipe the whipped cream on top. Garnish with coconut shavings or toasted coconut for extra flavor and texture.
Step 10: Serve
Slice and serve chilled. Store leftovers in the refrigerator for up to 3 days.
2. Tips for Perfect Coconut Cream Pie
Start by cooking the custard slowly over medium heat and whisking constantly to keep it smooth and prevent scorching on the bottom of the pan.
When combining the hot liquid with the egg yolks, take your time to temper them gradually, which helps maintain a silky texture without curdling.
Using high-quality, full-fat coconut milk enhances both the flavor and richness of the filling, giving the pie its signature taste.
Allow the custard to thicken fully on the stove before removing it from the heat, as undercooking can result in a runny consistency later.
It’s also important to let the pie chill long enough in the refrigerator so the filling sets properly—rushing this step can affect the final texture.
For the topping, whip the cream just until stiff peaks form to keep it light and airy.
Adding toasted coconut on top not only improves the presentation but also introduces a subtle crunch that complements the creamy layers beautifully.
3. Frequently Asked Questions
Can I use a store-bought pie crust?
Yes, a store-bought crust works well and saves time. Just be sure to blind-bake it before adding the filling.
How do I know when the custard is thick enough?
The custard should coat the back of a spoon and hold its shape when you run a finger through it. It will also thicken further as it cools.
Can I make this pie ahead of time?
Absolutely. This pie is ideal for making a day in advance, as it needs several hours to chill and set properly.
Can I freeze coconut cream pie?
Freezing is not recommended because the custard can become watery and the texture may change when thawed.
What can I use instead of half-and-half?
You can substitute equal parts whole milk and heavy cream if you don’t have half-and-half available.
4. Nutrition Information
| Nutrient | Amount per Slice |
|---|---|
| Calories | 420 kcal |
| Total Fat | 28 g |
| Saturated Fat | 20 g |
| Cholesterol | 135 mg |
| Sodium | 220 mg |
| Carbohydrates | 38 g |
| Sugar | 24 g |
| Protein | 5 g |
This basic coconut cream pie recipe is a timeless dessert that delivers both flavor and elegance with every bite. From the flaky crust to the creamy coconut filling and airy whipped topping, each layer plays a role in creating a perfectly balanced treat.
By following the detailed steps and tips provided, you can confidently make this pie from scratch and impress anyone who takes a slice. Whether served at a holiday gathering or enjoyed as a weekend indulgence, coconut cream pie is always a delicious choice.
