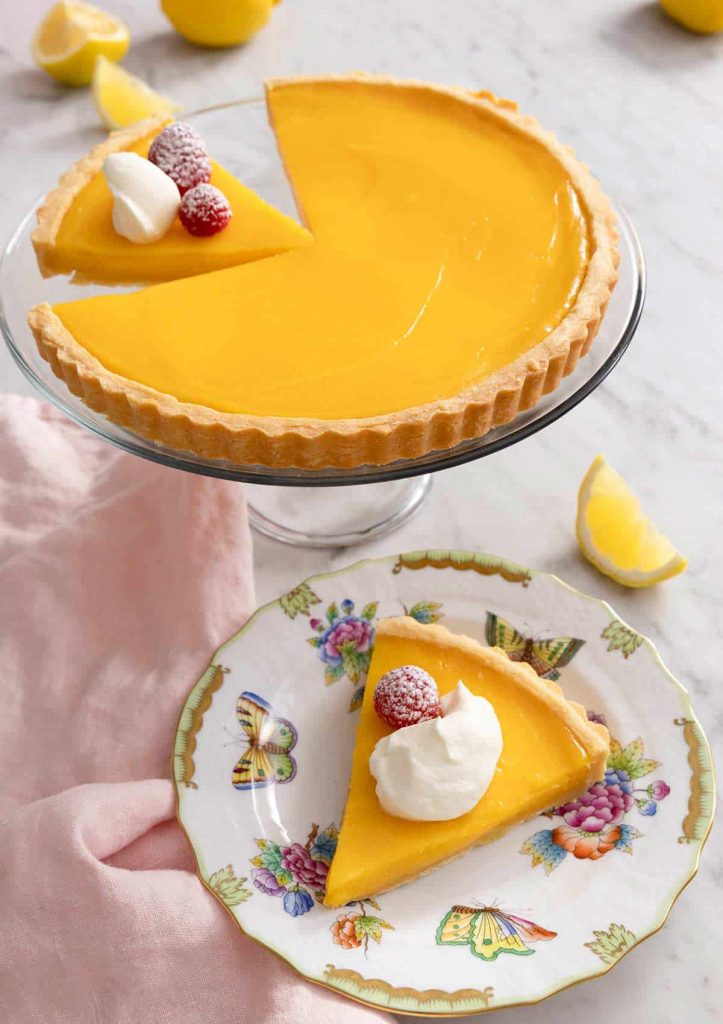
Creating a lemon tart from scratch is one of the most satisfying baking experiences. With its crisp, buttery crust and silky, tangy-sweet filling, this classic dessert strikes the perfect balance of richness and freshness.
In this article, I will instruct you how to make lemon tart perfectly at home. By following the techniques below, you’ll achieve a beautifully set lemon curd nestled in a golden crust that looks as stunning as it tastes.
1. Lemon Tart Recipe ( Yield: 8 Serving )
Ingredients
For the Crust
1 ¼ cups all-purpose flour (150g)
¼ teaspoon salt
½ cup butter, cold and cut into small pieces (113g)
¼ cup granulated sugar (50g)
2 tablespoons cream (10ml)
1 egg yolk
For the Curd
½ cup fresh lemon juice (120ml)
2 tablespoons lemon zest (zest of 2 lemons)
1 cup granulated sugar (200g)
½ cup butter (113g)
4 eggs
2 egg yolks
Equipment
9–10 inch tart pan
Instructions
Step 1: Prepare the crust dough
In a large mixing bowl, whisk together the flour, salt, and sugar. Add the cold butter pieces and use your fingertips or a pastry cutter to rub the butter into the flour until the mixture resembles coarse crumbs. This step is essential for achieving a flaky texture.
Step 2: Add wet ingredients
Mix in the egg yolk and cream. Stir gently until the dough just comes together. Avoid overmixing, as this can make the crust tough.
Step 3: Chill the dough
Shape the dough into a disk, wrap it in plastic wrap, and refrigerate for at least 30 minutes. Chilling helps the butter firm up and makes rolling easier.
Step 4: Roll and fit into pan
On a lightly floured surface, roll out the dough into a circle about ⅛ inch thick. Carefully transfer it into your tart pan, pressing it into the edges and trimming any excess. Prick the bottom with a fork to prevent puffing.
Step 5: Blind bake the crust
Preheat your oven to 180°C (350°F). Line the crust with parchment paper and fill with pie weights or dried beans. Bake for 15 minutes, then remove the weights and bake for another 10–12 minutes until lightly golden. Let it cool completely.
Step 6: Prepare the lemon curd
In a heatproof bowl, whisk together the eggs, egg yolks, sugar, lemon juice, and zest. Place the bowl over a saucepan of simmering water (double boiler method), making sure the bottom doesn’t touch the water.
Step 7: Cook the curd
Stir continuously with a whisk or spatula until the mixture thickens and coats the back of a spoon. This usually takes about 8–10 minutes. Do not rush this step or increase the heat too much, as the eggs may scramble.
Step 8: Add butter
Remove the curd from heat and stir in the butter, one piece at a time, until fully melted and incorporated. This gives the curd a smooth, glossy finish.
Step 9: Strain and fill
For an ultra-smooth texture, strain the curd through a fine sieve into the baked crust. Spread evenly.
Step 10: Bake the tart
Return the tart to the oven and bake for 10–12 minutes at 160°C (320°F), just until the filling is set but still slightly jiggly in the center.
Step 11: Cool and chill
Allow the tart to cool at room temperature, then refrigerate for at least 2 hours before serving. This helps the filling fully set.
Step 12: Serve
Slice and serve as is, or garnish with powdered sugar, whipped cream, or fresh berries for added elegance.
2. Tips for Perfect Homemade Lemon Tart
Achieving a flawless lemon tart comes down to technique and attention to detail.
Always use fresh lemon juice rather than bottled for the brightest flavor. Zesting the lemons before juicing makes the process easier and ensures you capture all the aromatic oils.
Keep your butter cold when making the crust. This is key to creating a tender, flaky texture. If the dough becomes too soft while working with it, return it to the refrigerator for a few minutes.
When cooking the curd, patience is crucial. Use gentle heat and constant stirring to prevent curdling. If you notice lumps forming, immediately remove from heat and whisk vigorously.
Avoid overbaking the tart after adding the filling. The center should still have a slight wobble when you remove it from the oven; it will firm up as it cools.
For clean slices, dip your knife in hot water and wipe it dry between cuts.
3. Frequently Asked Questions
Can I make the lemon tart ahead of time?
Yes, lemon tart is an excellent make-ahead dessert. You can prepare it a day in advance and store it in the refrigerator. The flavor often improves as it rests.
How do I know when the lemon curd is thick enough?
The curd is ready when it coats the back of a spoon and you can draw a line through it with your finger. It should be thick but still pourable.
Can I freeze lemon tart?
Freezing is possible, but it may slightly affect the texture of the curd. If you do freeze it, wrap it tightly and thaw in the refrigerator before serving.
What can I use instead of a tart pan?
A pie dish can be used as an alternative, though the presentation will differ. Make sure to adjust baking times slightly if needed.
Why did my curd turn out runny?
Runny curd is usually due to undercooking. Ensure it reaches the proper thickness on the stove and allow enough chilling time for it to set completely.
4. Nutrition Information
| Nutrient | Amount per Serving |
|---|---|
| Calories | 420 kcal |
| Carbohydrates | 45 g |
| Protein | 6 g |
| Fat | 25 g |
| Saturated Fat | 15 g |
| Cholesterol | 165 mg |
| Sodium | 120 mg |
| Sugar | 30 g |
| Fiber | 1 g |
This lemon tart recipe delivers a perfect harmony of crisp pastry and luscious citrus filling. With its vibrant flavor and elegant appearance, it’s a dessert that feels both refreshing and indulgent. By following the steps carefully and applying the tips provided, you can confidently create a bakery-quality tart in your own kitchen.
