This 4-Ingredient Homemade Artisan Bread Recipe is perfect for beginners because it’s no knead, no mixer, and no fuss. With just flour, yeast, salt, and water, you can make a loaf that looks like it came straight from a bakery. This rustic-style bread features a chewy interior with a beautifully golden, crispy crust. It’s ideal for sandwiches, soups, or simply served warm with butter.
1. Homemade Artisan Bread Recipe (No Knead)
(Yield: 2 8-inch loaves)
Ingredients
- 3 and 1/4 cups (about 430g) bread flour, plus more for dusting
- 2 teaspoons (about 6g) instant yeast
- 2 teaspoons (about 9g) coarse salt (reduce to 1½ tsp if using fine salt)
- 1 and 1/2 cups (360ml) water, close to room temperature (about 70°F / 21°C)
- Optional: cornmeal for dusting pan
Instructions
Step 1: Combine the Dry Ingredients
In a large mixing bowl, whisk together the bread flour, instant yeast, and salt until evenly combined. Bread flour works best because it has a higher protein content, which gives your bread better structure and chew.
Step 2: Add Water and Mix
Pour in the room-temperature water. Using a wooden spoon or spatula, stir until a shaggy, sticky dough forms. Don’t worry if it looks rough — it’s supposed to! The dough should be thick, sticky, and slightly lumpy.
Tip: If the dough seems too dry, add 1–2 tablespoons of water. If it’s overly wet, sprinkle in a bit more flour.
Step 3: Let the Dough Rise (First Proof)
Cover the bowl tightly with plastic wrap or a clean kitchen towel. Let it rest at room temperature (70°F / 21°C) for 10–12 hours, or overnight. During this long rest, the dough will rise slowly and develop rich flavor and airy texture.
After resting, the dough should have doubled in size and have a few bubbles on the surface.
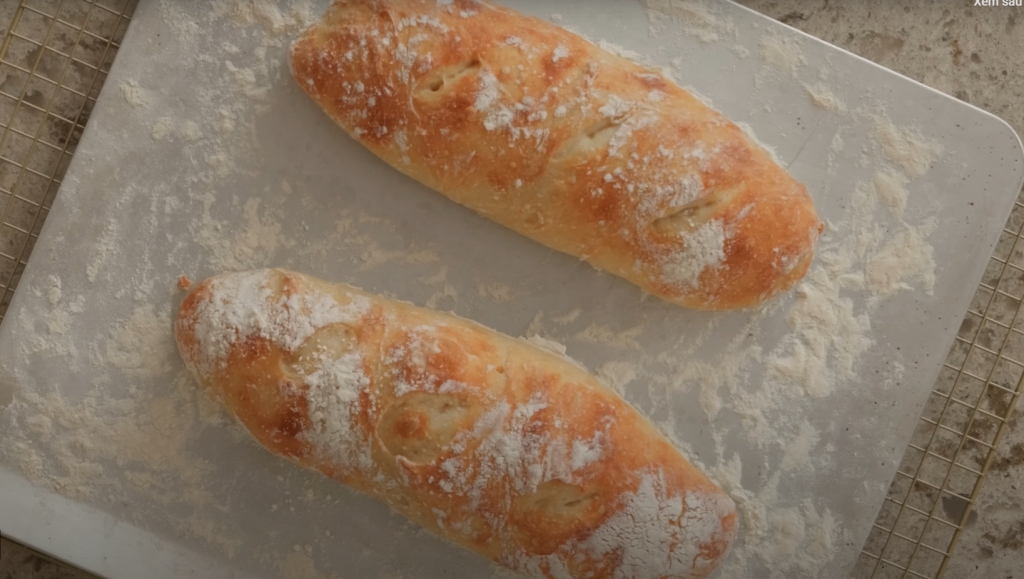
Step 4: Shape the Dough
Lightly flour your hands and a clean surface. Gently turn the dough out of the bowl onto the floured area. Next, divide the dough into two equal portions and shape each one.
The dough will be sticky, so use a bench scraper or floured hands to help shape it into a round or long loaf. Avoid over-handling — you don’t want to deflate the air bubbles that formed during proofing.
Step 5: Second Rise (Final Proof)
Place each shaped dough on a parchment-lined baking sheet dusted with flour or cornmeal. Cover lightly with a towel and let rest for 30–45 minutes. The dough should puff slightly but not double in size again.
Meanwhile, preheat your oven to 450°F (230°C). If you have a Dutch oven, place it in the oven during preheating. This helps create steam and produces that perfect artisan crust.
Step 6: Bake the Bread
If using a Dutch oven:
- Carefully remove it from the oven and line it with parchment paper.
- Gently transfer the dough into the pot, cover with the lid, and bake for 30 minutes.
- Remove the lid and bake uncovered for another 10–15 minutes, until golden brown and crusty.
If baking on a baking sheet:
- Place a small pan of hot water on the lower rack to create steam.
- Bake the bread on the middle rack for 35–40 minutes, until the crust is deep golden and the loaf sounds hollow when tapped.
Step 7: Cool and Enjoy
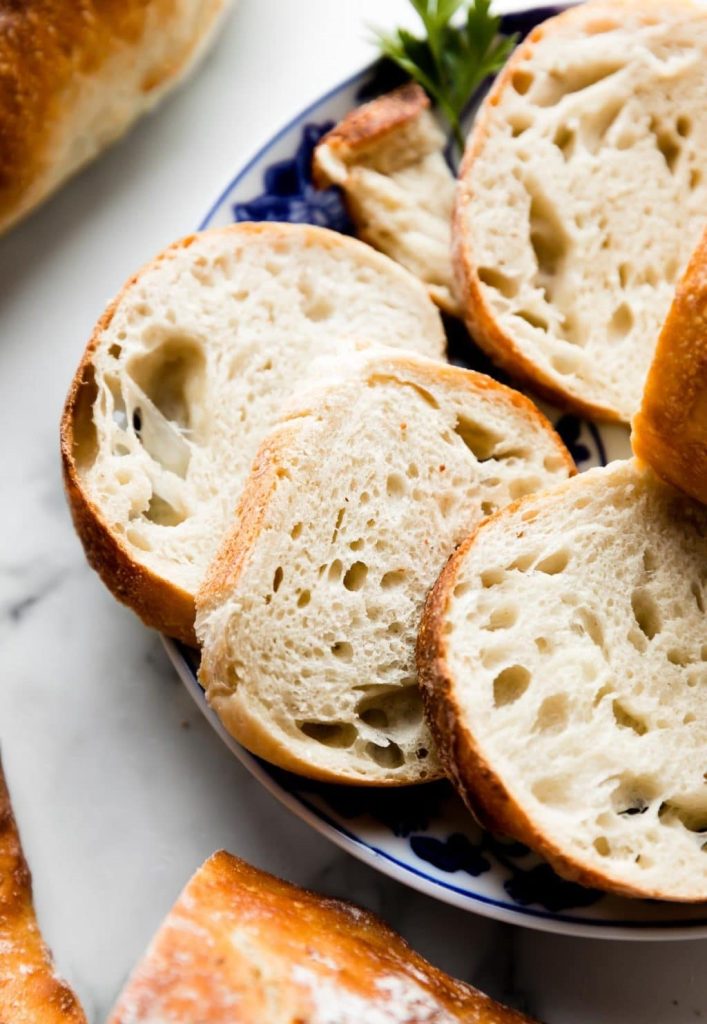
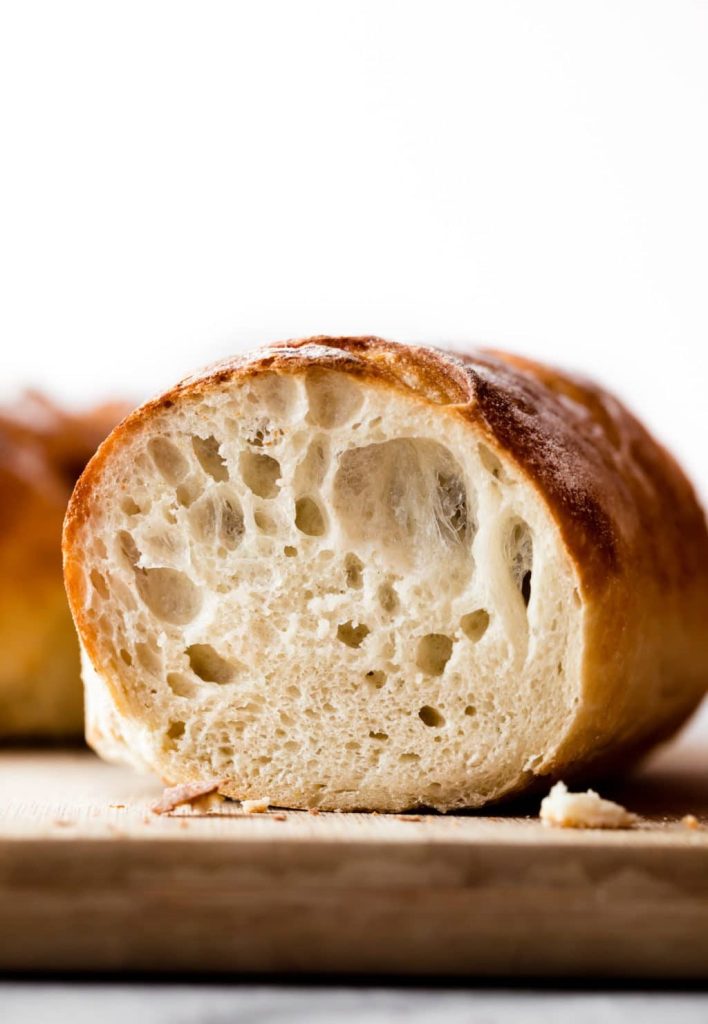
Once baked, transfer the loaves to a wire rack and allow them to cool for at least 1 hour before slicing. This resting time helps set the crumb and prevents a gummy interior.
Slice, serve, and enjoy your homemade artisan bread warm with butter, jam, or olive oil!
2. Tips for Perfect Homemade Artisan Bread
Use bread flour for best texture. The higher protein content helps the bread rise beautifully and form a chewy crumb.
Room-temperature water is key. Too hot and it can kill the yeast; too cold and it slows fermentation. Aim for about 70°F (21°C).
Don’t over-handle the dough. This recipe is “no knead,” meaning the gluten develops naturally through fermentation — not through mixing.
Let it rest long enough. Overnight fermentation builds flavor and structure.
Create steam for a crisp crust. Baking in a covered Dutch oven or adding a pan of water in the oven mimics professional steam baking.
Allow cooling time. Cutting bread while it’s too hot can ruin the texture. Wait at least an hour before slicing.
3. Frequently Asked Questions
Can I use all-purpose flour instead of bread flour?
Yes! The texture will be slightly softer, but the bread will still turn out delicious. If using all-purpose flour, you may need to add an extra tablespoon or two since it absorbs water differently.
Can I refrigerate the dough overnight?
Absolutely. After mixing, you can refrigerate the dough for up to 24 hours. Chilling the dough slows fermentation and enhances flavor. Let it rest at room temperature for about 45 minutes before baking.
How do I store homemade artisan bread?
Keep the bread in a paper bag or wrapped in a kitchen towel at room temperature for up to 3 days. For longer storage, slice and freeze it in airtight bags for up to 3 months. Toast or warm before serving.
Why didn’t my bread rise properly?
Check the freshness of your yeast — expired yeast won’t activate. Also, make sure your room isn’t too cold; yeast thrives best around 70–75°F (21–24°C).
Can I add flavors like herbs or cheese?
Definitely! Try adding 1 teaspoon of dried rosemary, minced garlic, or shredded cheese for a flavorful twist.
4. Nutrition Information
| Nutrient | Per Serving (1 slice, about 50g) |
|---|---|
| Calories | 135 kcal |
| Carbohydrates | 27 g |
| Protein | 5 g |
| Fat | 0.8 g |
| Saturated Fat | 0.1 g |
| Cholesterol | 0 mg |
| Sodium | 260 mg |
| Fiber | 1.5 g |
| Sugar | 0.2 g |
| Calcium | 8 mg |
| Iron | 1.7 mg |
This 4-Ingredient Homemade Artisan Bread (No Knead) is proof that simplicity can yield amazing results. With just a few pantry staples, you can create bread that rivals any bakery loaf. It’s crispy on the outside, tender on the inside, and requires almost no effort — perfect for busy days or beginner bakers.
Whether served alongside a bowl of soup, topped with avocado, or enjoyed plain with butter, this artisan bread brings comfort and flavor to any meal. Once you try this easy method, you’ll never go back to store-bought bread again!
