Brioche is the epitome of French baking—soft, buttery, and slightly sweet, it bridges the gap between bread and pastry. This authentic brioche bread recipe delivers that classic golden crust and rich interior that melts in your mouth. Whether you’re enjoying it plain, toasted with butter, or transformed into French toast, this recipe will make your kitchen smell like a Parisian boulangerie.
1. Authentic Brioche Bread Recipe (Yield: Makes 2 Loaves)
Ingredients
- ½ cup warm milk
- 2 ½ teaspoons (9 g) active dry yeast
- 2 teaspoons honey
- 5 large eggs (or 4 large eggs + 2 yolks)
- 1 yolk (from a large egg) (use 2 yolks if using 4 eggs)
- 2 teaspoons vanilla extract
- 5 tablespoons granulated sugar
- 17.6 oz (4 cups + 2 tbsp) all-purpose flour (measured by spoon and level method)
- 1 ½ teaspoons fine sea salt
- 8.8 oz (1 cup + 2 tbsp) unsalted butter, very soft and divided into four portions
Instructions
Step 1: Activate the Yeast
In a small bowl, combine warm milk, honey, and yeast. Let it sit for 5–10 minutes until frothy and bubbly. This step ensures your yeast is alive and ready to make the dough rise.
Step 2: Prepare the Egg Mixture
In a large mixing bowl, whisk together the eggs, extra yolk, vanilla extract, and sugar until well combined. The mixture should be smooth and slightly pale.
Step 3: Combine Wet and Dry Ingredients
Add the yeast mixture to the egg mixture. Using a stand mixer fitted with a dough hook, add flour and salt. Mix on low speed until a shaggy dough forms—about 3 minutes.
Scrape down the sides, then knead the dough on medium speed for another 10–12 minutes, or until it becomes elastic and slightly sticky. Avoid adding extra flour at this stage; brioche dough should be soft and rich.
Step 4: Add the Butter
Gradually add the softened butter in four portions, allowing each portion to fully incorporate before adding the next. Continue mixing for another 10–15 minutes until the dough is smooth, glossy, and slightly tacky but not sticky.
To test, stretch a small piece between your fingers. It should form a thin “windowpane” without tearing easily—this means gluten has developed properly.
Step 5: First Rise (Bulk Fermentation)
Transfer the dough to a greased bowl and cover it with plastic wrap. Let it rise in a warm place for 1½–2 hours, or until doubled in size.
If your kitchen is warm, keep an eye on it so it doesn’t overproof. For the best flavor, you can refrigerate the dough overnight (8–12 hours). The slow fermentation enhances the buttery aroma and makes shaping easier.
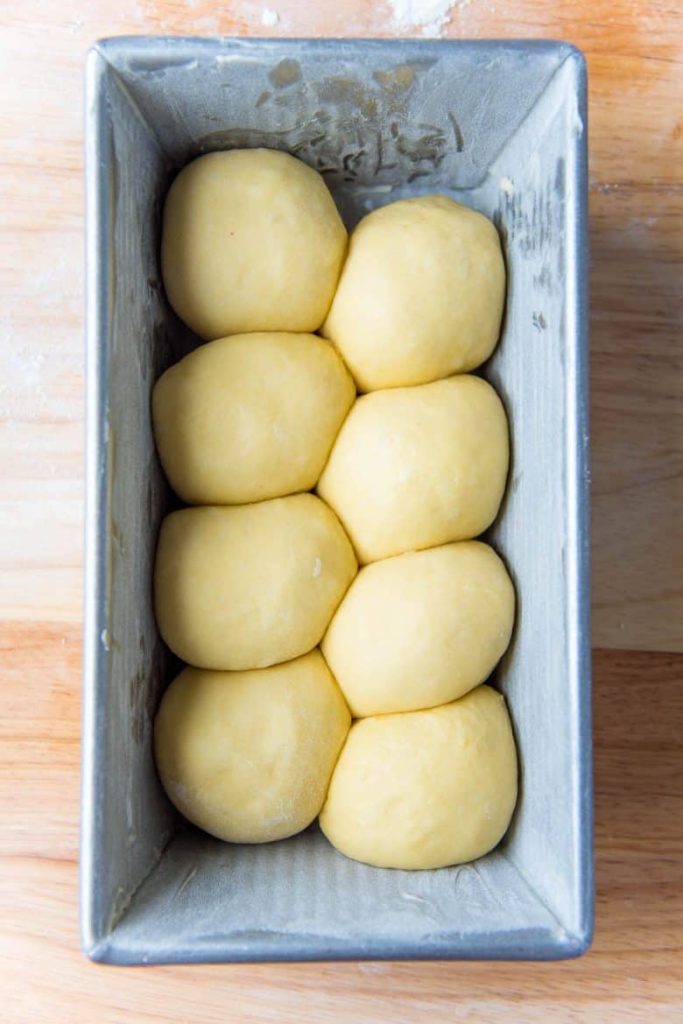
Step 6: Shape the Dough
After the first rise, gently punch down the dough to release air. Divide it in half to make two loaves.
For a traditional brioche loaf:
- Divide each half into 8 equal balls.
- Arrange them side by side in a greased loaf pan (8×4 inch).
- Alternatively, you can braid the dough for a classic French presentation.
Step 7: Second Rise
Cover the pans lightly with a kitchen towel or plastic wrap. Let them rise again for 1–2 hours, or until the dough is puffed and slightly above the rim of the pan.
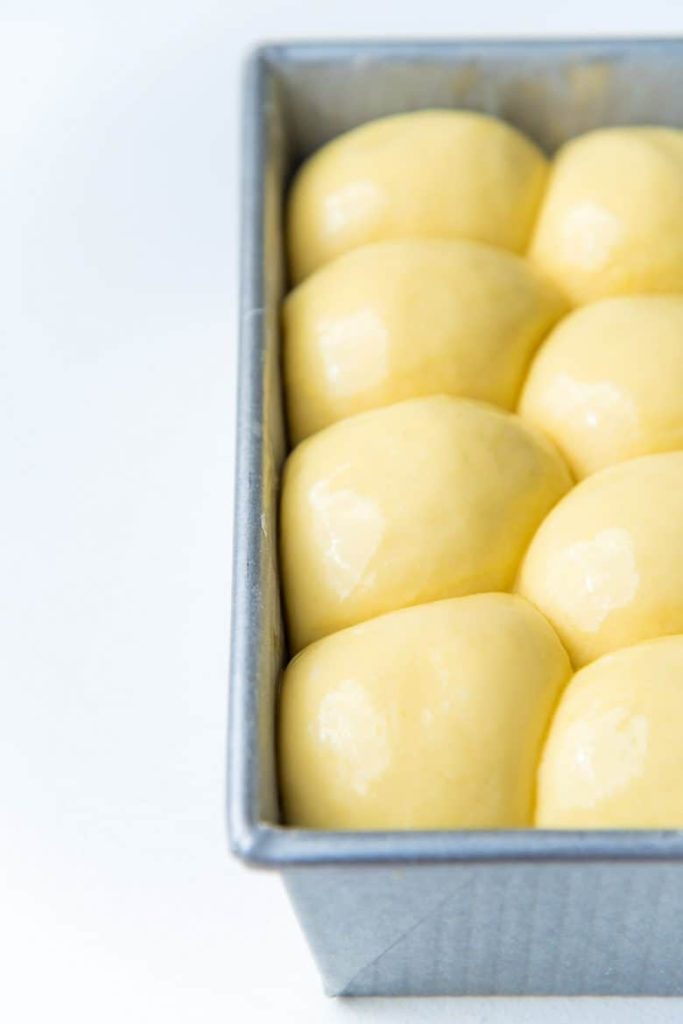
Step 8: Egg Wash and Bake
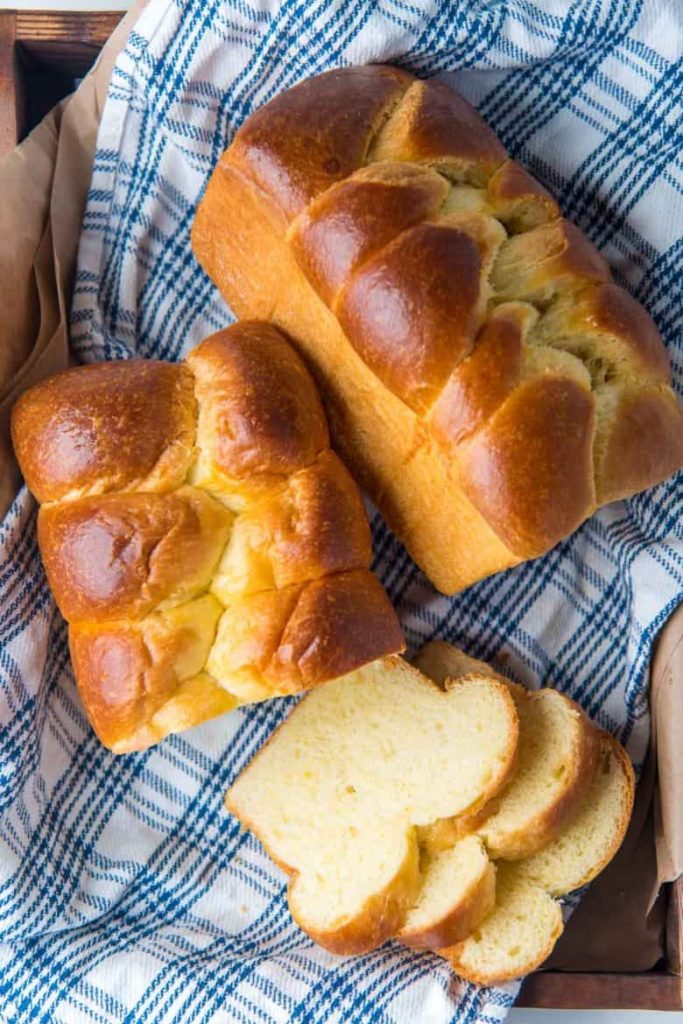
Preheat your oven to 350°F (175°C). Brush the tops of the loaves with an egg wash made from 1 egg beaten with 1 tablespoon of milk. This gives the bread its signature golden shine.
Bake for 25–30 minutes, or until the tops are deep golden brown and the internal temperature reaches about 190°F (88°C).
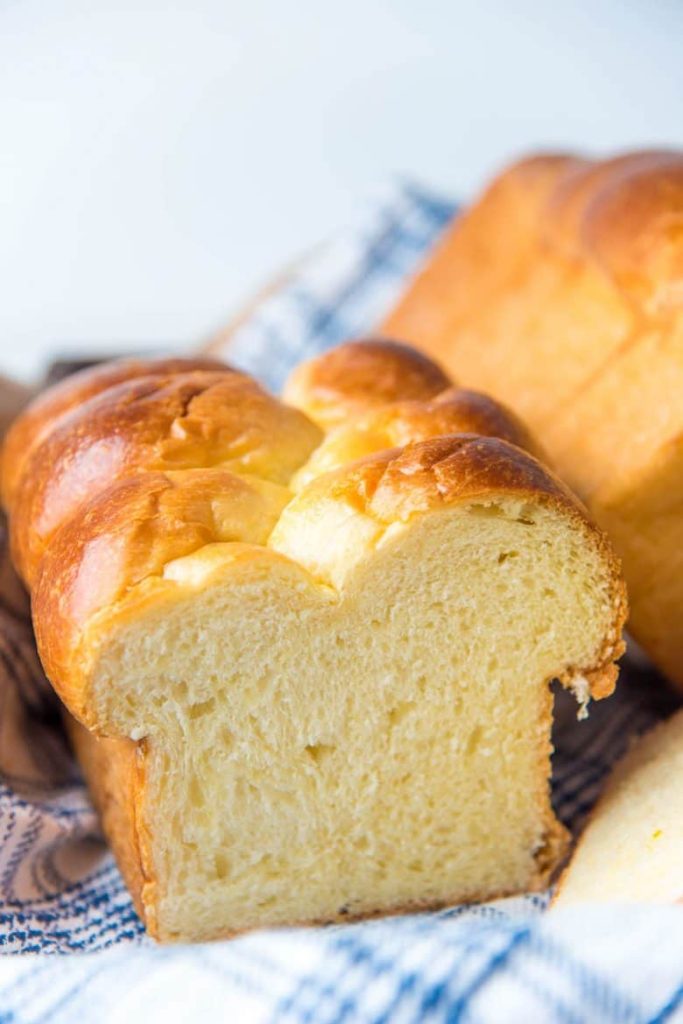
Step 9: Cool and Serve
Remove the brioche from the pans and let it cool on a wire rack. Avoid cutting into the loaves while they’re hot—this helps maintain the delicate crumb structure.
Enjoy your homemade French brioche fresh, toasted, or as the base for decadent French toast, bread pudding, or sandwiches.
2. Tips for Perfect Homemade French Brioche Bread
Use room temperature ingredients.
Cold butter or eggs can prevent the dough from coming together smoothly. Ensure all ingredients are at room temperature for best results.
Don’t rush the kneading process.
Brioche dough requires time for gluten development. Mixing for 20–25 minutes in total helps achieve that soft, stretchy structure.
Chill the dough before shaping.
Since brioche dough is rich and sticky, chilling it for 1–2 hours (or overnight) makes it easier to handle and shape.
Be patient with proofing.
Brioche takes longer to rise due to its high butter and egg content. Wait until it doubles in size for the best texture.
Check doneness with a thermometer.
An internal temperature of 190°F (88°C) ensures your brioche is fully baked but still soft inside.
Store properly.
Wrap cooled brioche tightly in plastic wrap or store it in an airtight container for up to 3 days. You can also freeze it for up to 2 months—just reheat in a low oven before serving.
3. Frequently Asked Questions
Q1: Can I make brioche without a stand mixer?
Yes, but it requires more effort. You can knead the dough by hand using a slap-and-fold technique for about 25–30 minutes. The key is to develop the gluten while incorporating the butter slowly.
Q2: Why is my brioche dense instead of fluffy?
Dense brioche usually results from under-kneading or not allowing enough proofing time. Make sure the dough doubles in size before baking, and knead until elastic and smooth.
Q3: Can I use instant yeast instead of active dry yeast?
Absolutely. Replace the same quantity (2½ teaspoons) and skip the activation step. Simply mix it directly with the flour.
Q4: Can I make mini brioche rolls instead of loaves?
Yes! Divide the dough into small balls (about 2 oz each) and bake them in a muffin tin for 15–18 minutes at 350°F (175°C).
Q5: What can I serve with brioche?
Brioche pairs beautifully with butter and jam for breakfast, or can be used for gourmet burgers, bread pudding, or French toast.
4. Nutrition Information (Per Serving)
| Nutrient | Amount |
|---|---|
| Calories | 275 kcal |
| Total Fat | 15 g |
| Saturated Fat | 9 g |
| Cholesterol | 115 mg |
| Sodium | 210 mg |
| Total Carbohydrates | 28 g |
| Dietary Fiber | 1 g |
| Sugars | 6 g |
| Protein | 6 g |
This authentic brioche bread recipe brings the elegance of French baking right into your home. Each loaf is rich with butter, fragrant with vanilla, and perfectly golden on the outside. With patience and the right technique, you’ll master the art of making brioche—ideal for breakfast spreads, sweet desserts, or savory dishes.